Smart BB-8 Loves Signing !
Designed By
Shiyin Tang(st966), Lijuan Hu(lh665)
Demonstration Video
Introduction
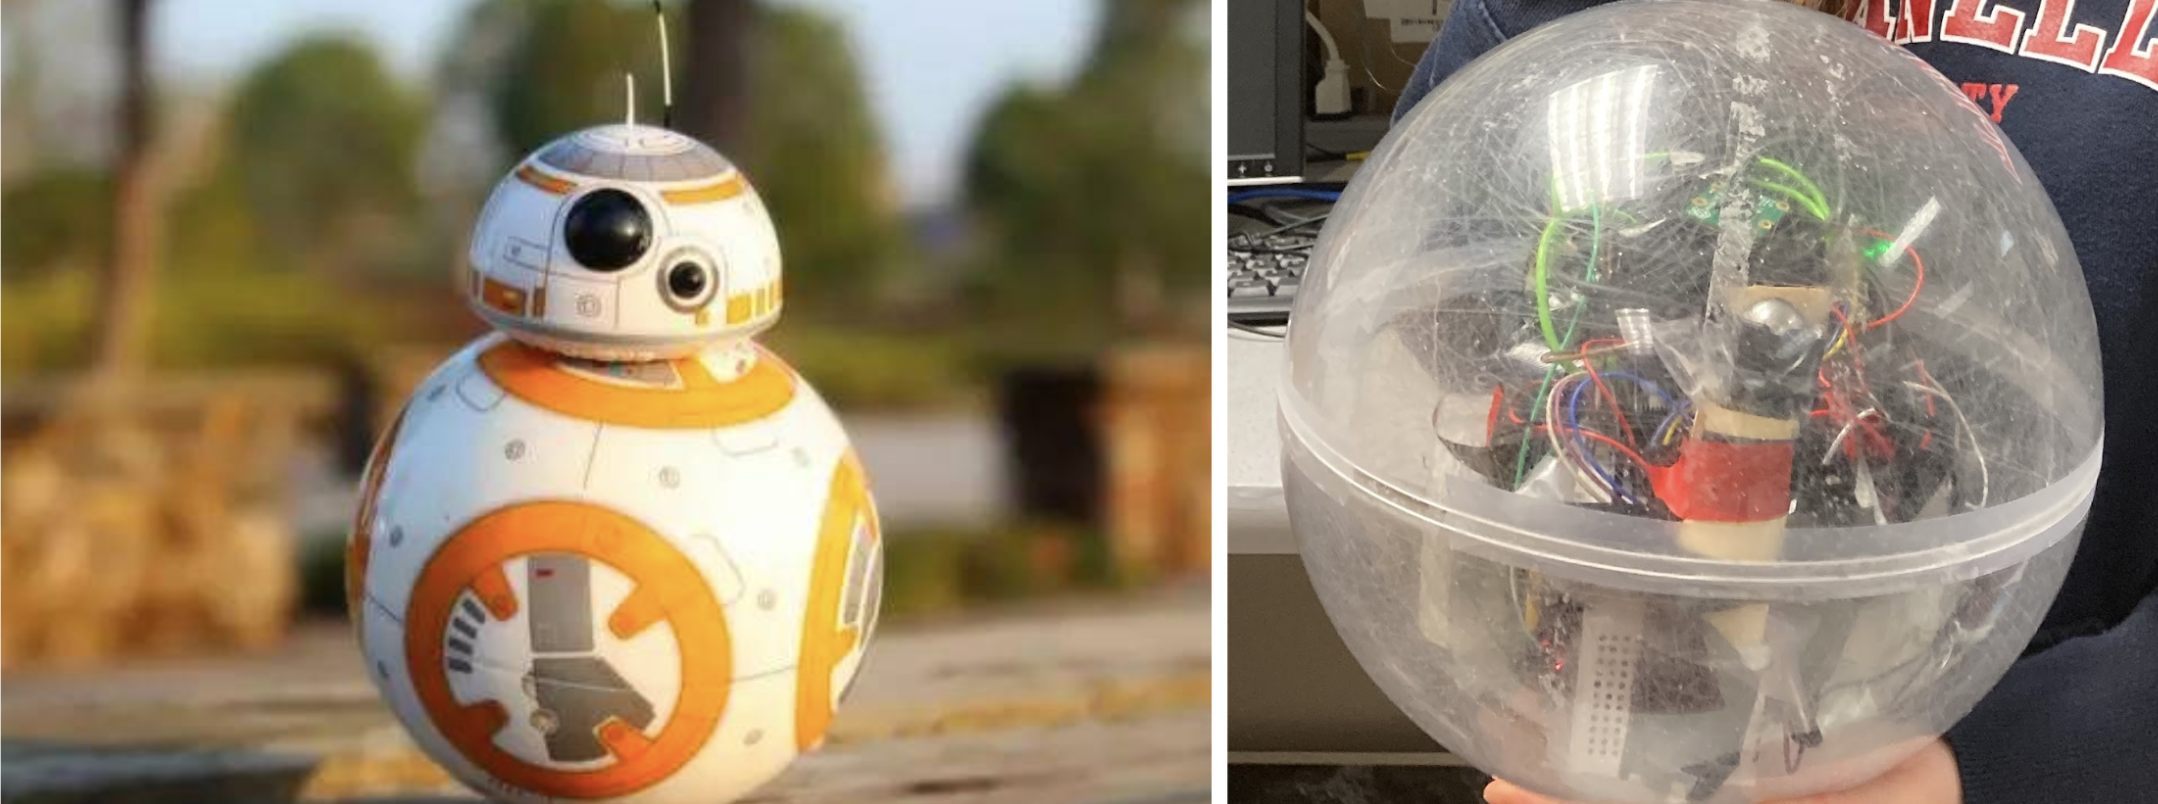
BB-8 is so cute and popular in the world, we really want to create a similar robot that could run in the ball!! So we designed a BB-8 brother robot, which is a running transparent ball controlled by a pi-car inside it. Our robot loves singing so it sings on its way! Our robot is controlled by Android under wifi, and the Android application wraps up all the functional modules, including a locomotion module, line-tracker module, obstacle avoidance module and see history module, and live video stream from pi camera. The Moving Control module has buttons to move the robot forward, backward, left and right, depending on which button you pressed. The Line Tracking module is where the robot tracks the black line on the ground, so our robot may be used to send packages or other stuff in the future. The Obstacle Avoidance module helps our robot avoid any obstacles encountered along its way. The See History plays a very cute BB-8 video. And we are also able to see what the robot sees through the phone interface by looking at the live video stream. View the above demo video to see the final product.
Project Objective
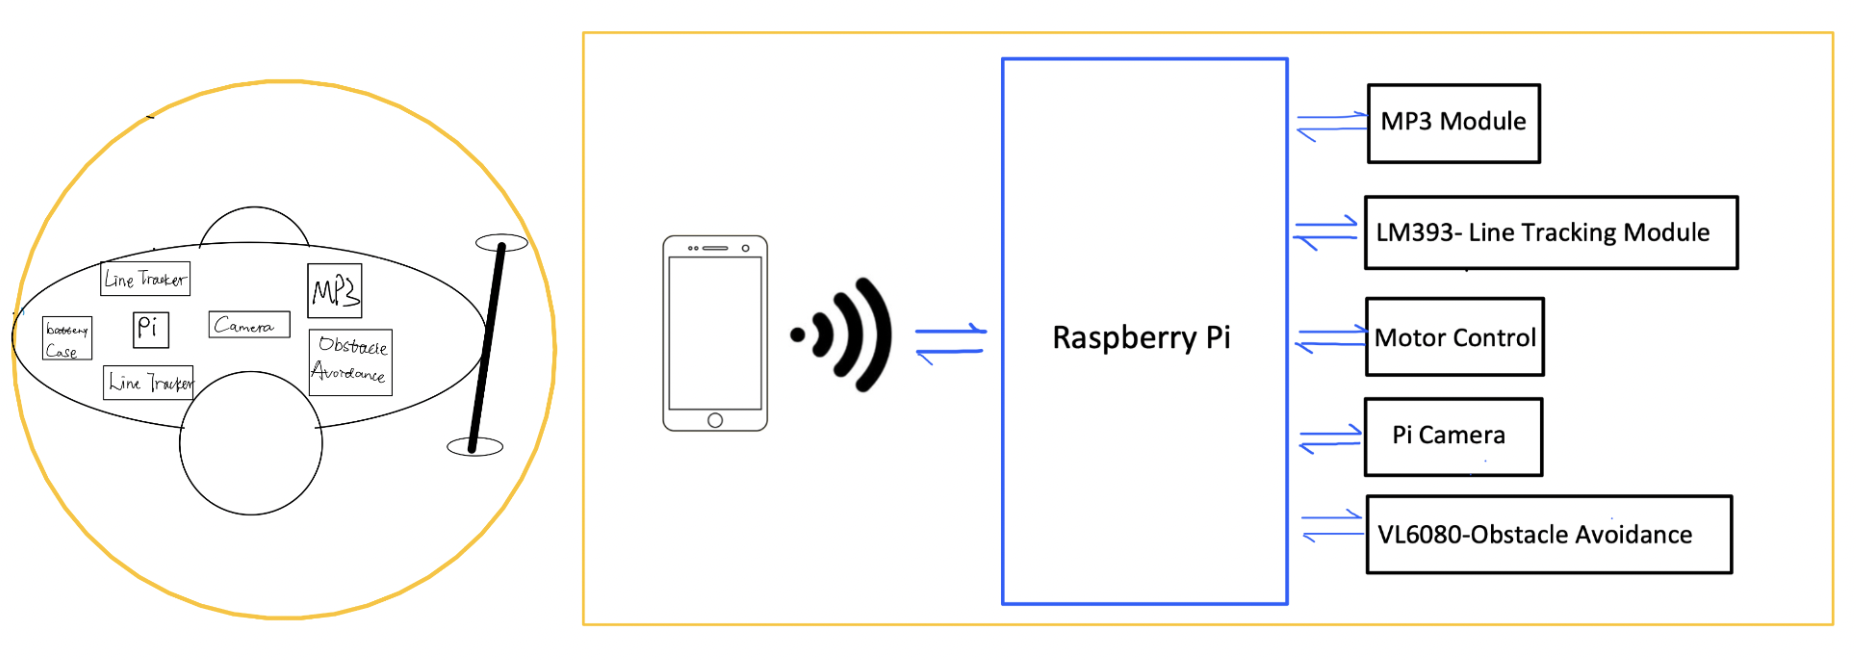
The following figure shows the general design of our project. Our goal is to create a BB-8 like robot(from the movie “Star Wars”)! Our robot has multiple functions. The phone is playing the role of the client and the Pi is the server, the communication between them is through socket programming.
Details about the project objectives is as follows:
Design
1.Moving Control
Mechanical Design:
In order to control the ball to be able to move around, we put a car inside the ball. Because the car wheel and the ball interface have contact with each other, the friction between them will drive the ball to move, so the ball can move depending on the force generated, that’s how the car drives the ball, thus moving the ball. Suppose we want to move the car forward, we could have two wheels both moving forward, thus generating a force that drives the ball to move forward as shown in the following figure.
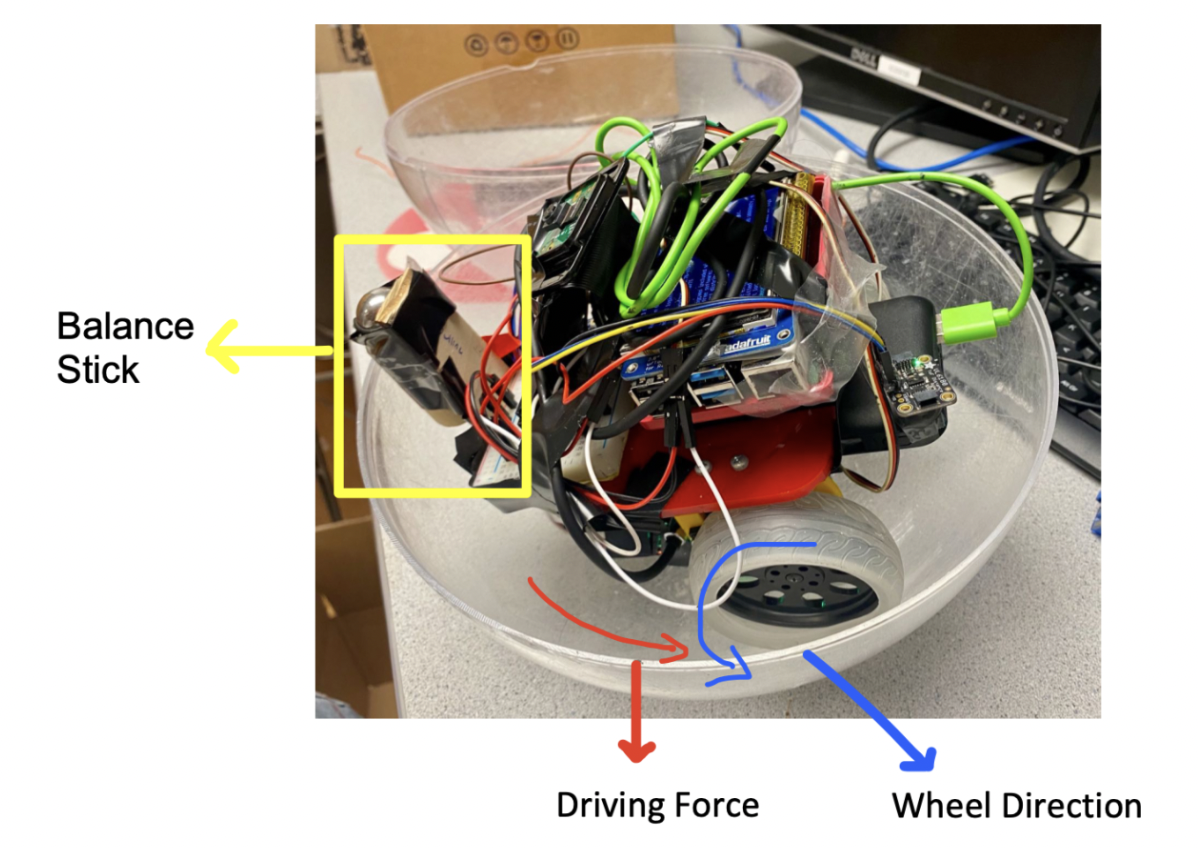
We also have set up a balance stick in the front of the car, this is designed to ensure that the wheels have contact with the ball, thus continuously providing the force to control the ball. Plus, using the stick can help the car keep balance without flipping over.
Motors:
Our original plan is to use the car from lab3, but it is too big for our ball, so we changed to use the new car given by the professor, which is equipped with two continuous servo motors.
The Parallax servo motors are used to control the motion of the robot. By using GPIO26 and GPIO16 as output PWM signals, one 6V battery pack power supply for these two motors, our robot can go forward, backward, turn left and turn right at a desired speed. The figure below shows the wire connection of Parallax continuous servo motors.
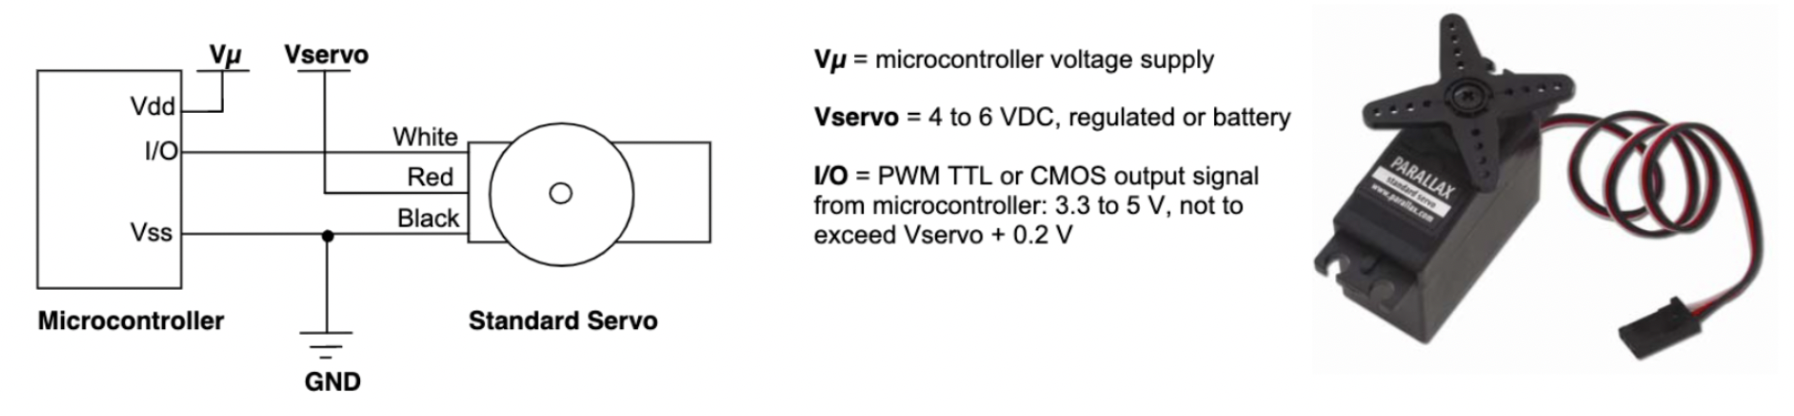
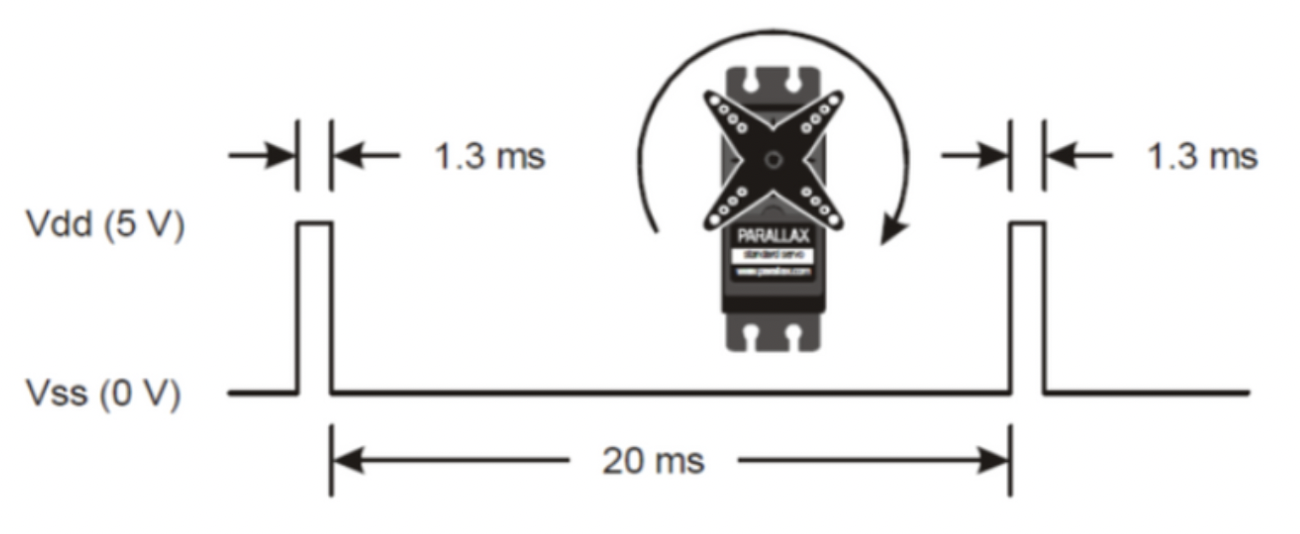
The Parallax Standard Servo is controlled through pulse width modulation, where the position of the servo shaft is dependent on the duration of the pulse. In order to hold its position, the servo needs to receive a pulse every 20 ms. As the length of the pulse decreases from 1.5ms, the servo will gradually rotate faster in the clockwise direction, as can be seen in the figure below. Likewise, as the length of the pulse increases from 1.5ms, the servo will gradually rotate faster in the counter-clockwise direction.
So we followed the guideline and datasheet and successfully set up the motor and wrote code for its movement ready for use once the Android has finished or set up.
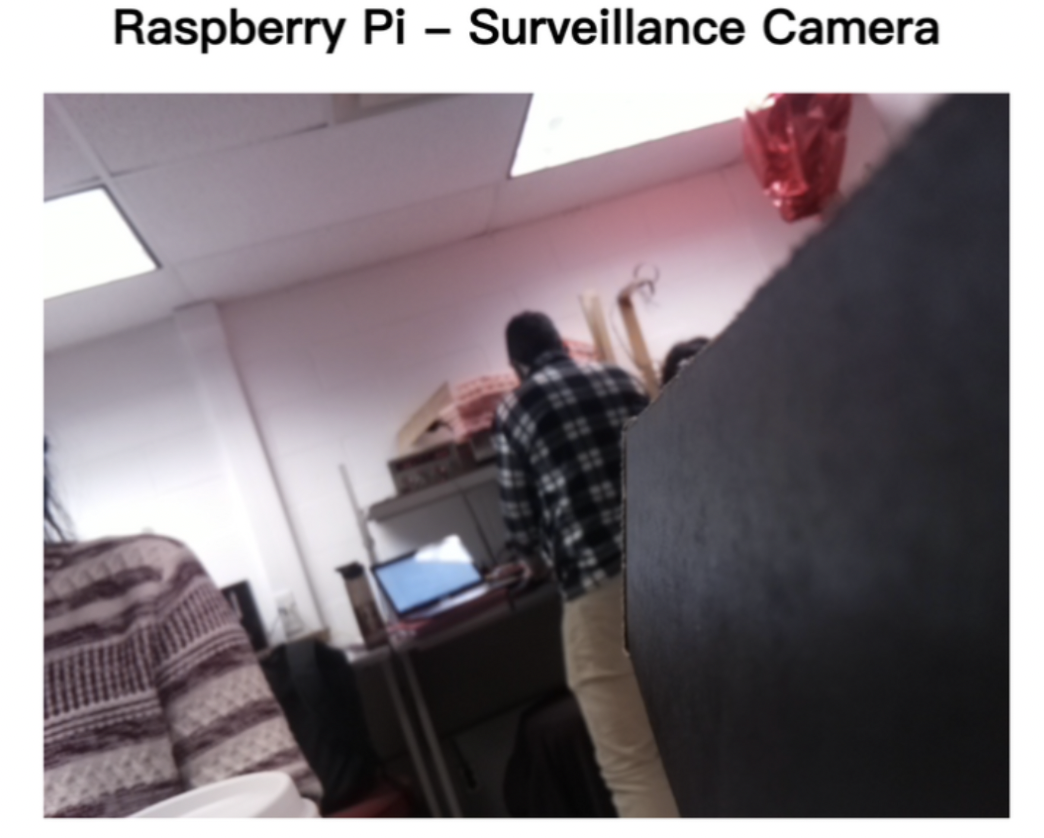
2.Pi Camera
We used the Raspberry Pi camera and installed it following this tutorial. We first connected the camera module to the CSI port on our Raspberry Pi; this is the long thin port adjacent to the HDMI socket.
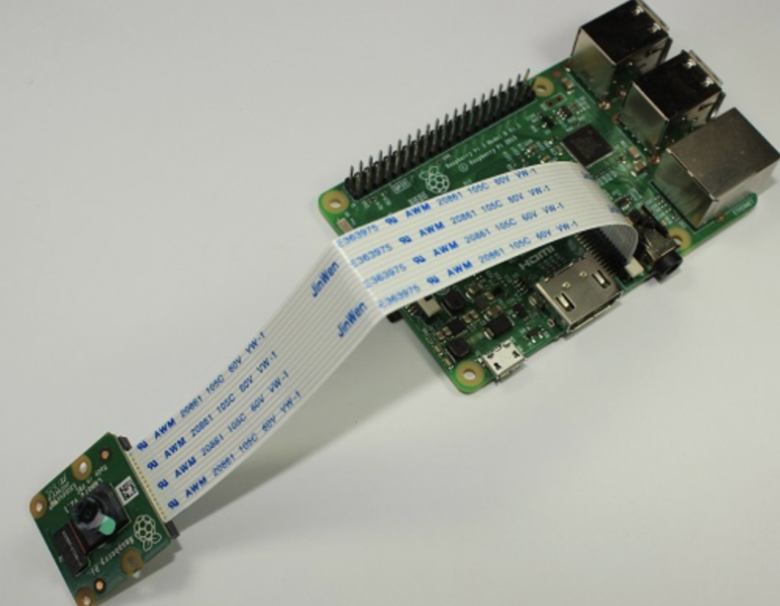
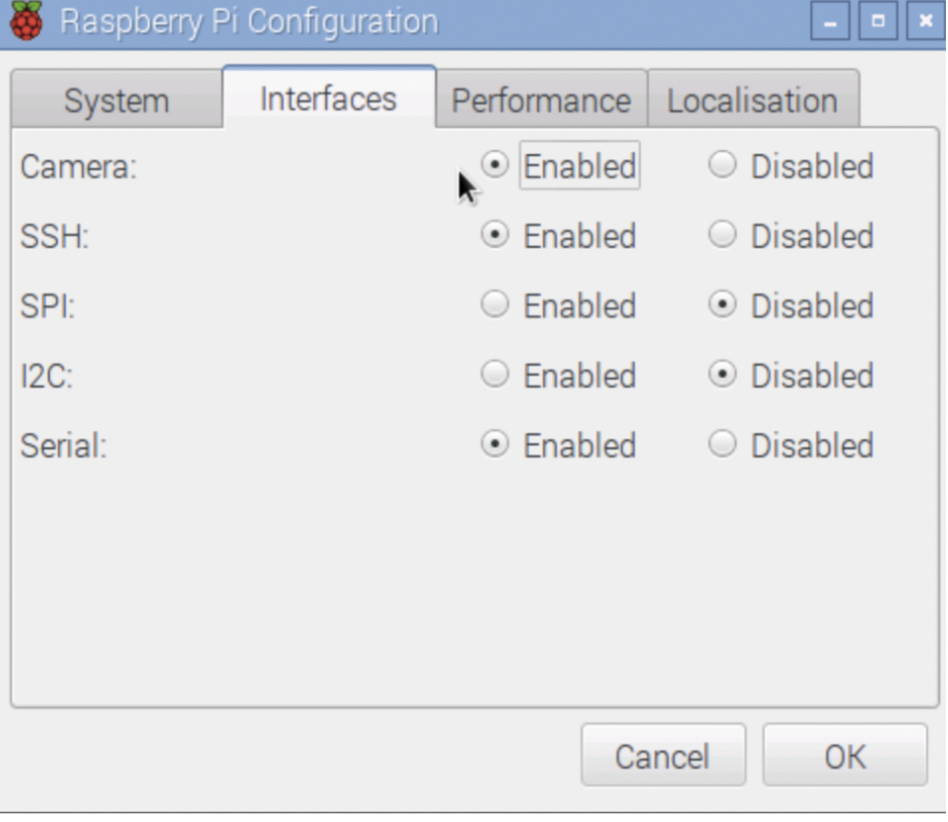
Gently lift the collar on top of the CSI port Slide the ribbon cable of the camera module into the port with the blue side facing the Ethernet port. And then press the collar back down to lock the cable in place. After successful installation of the camera, we should run sudo raspi-config start the Raspberry Pi Configuration utility and enable the camera module:
Once rebooted, start a terminal and try the following command:
raspistill -o image.jpg
If everything is working correctly, the camera should start, a preview from the camera should appear on the display and, after a 5 second delay it should capture an image.
To support Android applications for showing the camera, the script for video streaming can be found at the official PiCamera package documentation. We deploy the web server on port 8000. Pi sends a video stream to the web server, and we can access the video streaming web server at http://our_pi_address:8000, and now it is ready for the Android app to fetch the video stream.
3.MP3 Module
We used a power-storage speaker which does not need an external power supply after charging and it’s light enough for our robot to carry. The speaker is connected to the Raspberry Pi and then controlled using the mplayer, reference can be found here. If the robot is moving around or encountering some obstacles, the speaker will play related mp3, as shown in our demo video.
4.Remote Control
Android:
We designed an android application to interact with the remote server and control the raspberry pi to give commands through socket programming. On the android part, there are mainly three different parts of codes: TCP connection, start page activities and main page activities. Start page helps users input their server address and port by listening to the onClick event on the enter button. After such activity, the page would jump to the Main page. In the main page, there are mainly three parts to give support. First, we set the webview to load the camera on the server, which is already deployed on the pi address of port 8000. The webview information is set to automatically zoom the screen when opening the interface, and support automatic horizontal full-screen playback.
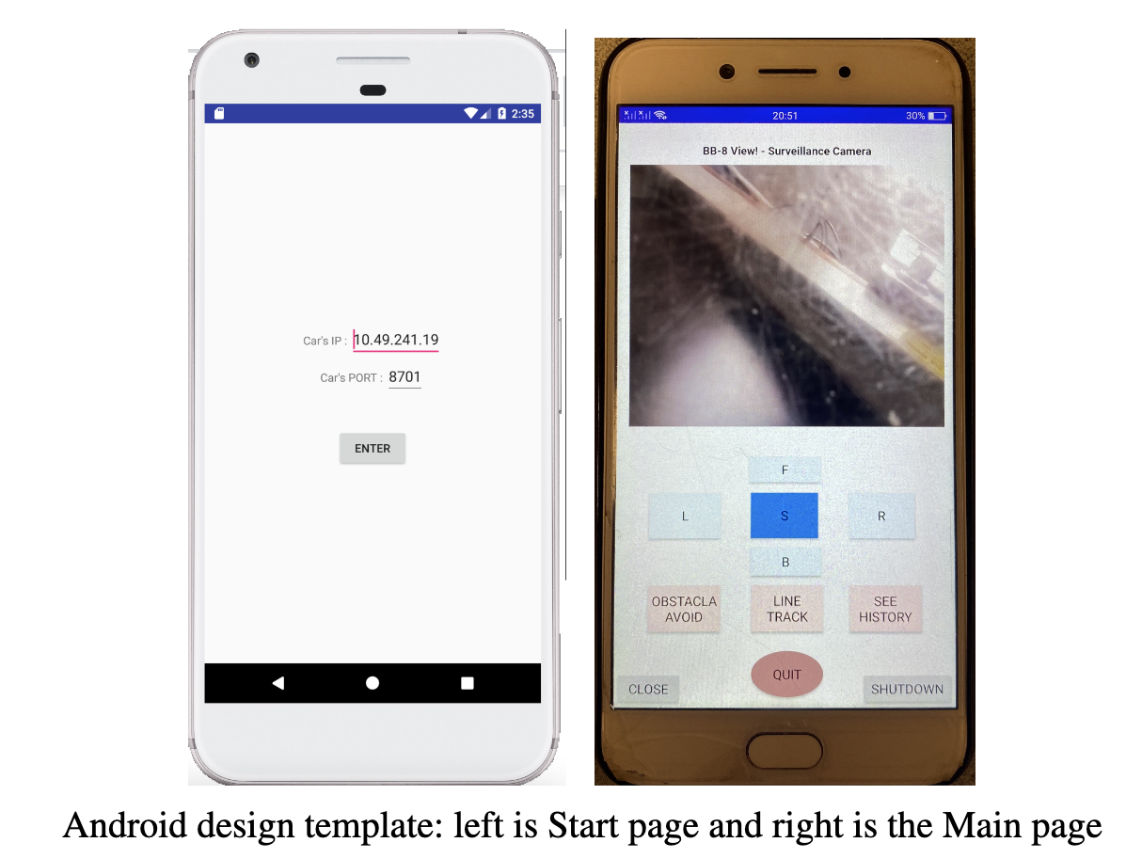
The second part is binding TCP connection to the server address recorded before. In the connecting period, if the TCPCommandService is binded successfully, the page will show a small popup notification“try to connect tcp server”, “connected successfully” or “connected failed” to help justify the current situation for users. The third part is the button's settings. We provide buttons with long press holding functions with the help of global value. If the pressing down action is detected, the control commands will be sending continuously per 1000 milliseconds until the finger up action is detected, and the global value is set false to impede the command sending process. “F” means forwards, “B” means backwards, “L” means left, “R” means right, “S” means stop, “Obstacle avoidance”, “Line Track” and “See History” are three functional modules and could be controlled by the “quit” button. “Close” and “Shutdown” could be used to quit the program.

In the TCP connection part, we mainly support two parts of coding. One is to create a TCPCommandService bound to the address and port mentioned before. Each time we get the output stream of TCP socket, get the bytes data of commands and write to the output stream. At the same time, the TCP should interact with the main page activity as well as providing the toast text for popping up the notification window. When the “close or shutdown” button is pressed, SendCommandBinder will create a new thread to control the main activity stop and quit the whole application.
Pi server:
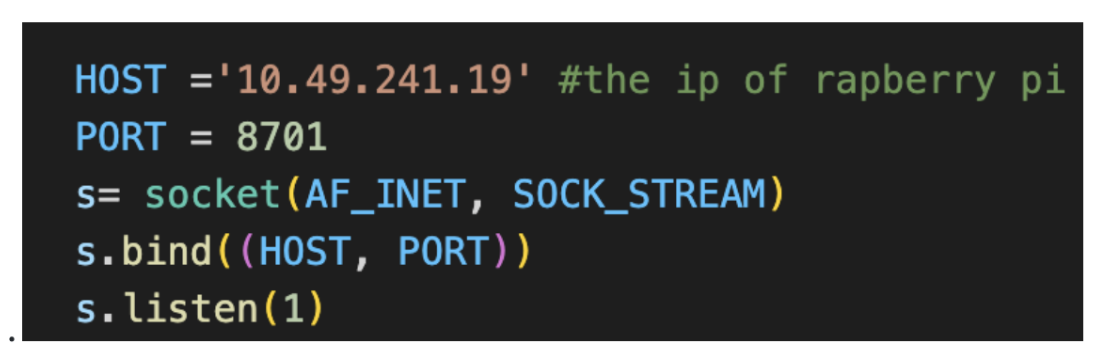
We wrote the pi_server.py to set up the socket server port and with sudo python3 pi_server.py, the raspberry pi will listening on 8701, once the Android part is sending the message, the server and reply to that, thus further controlling the pi car.
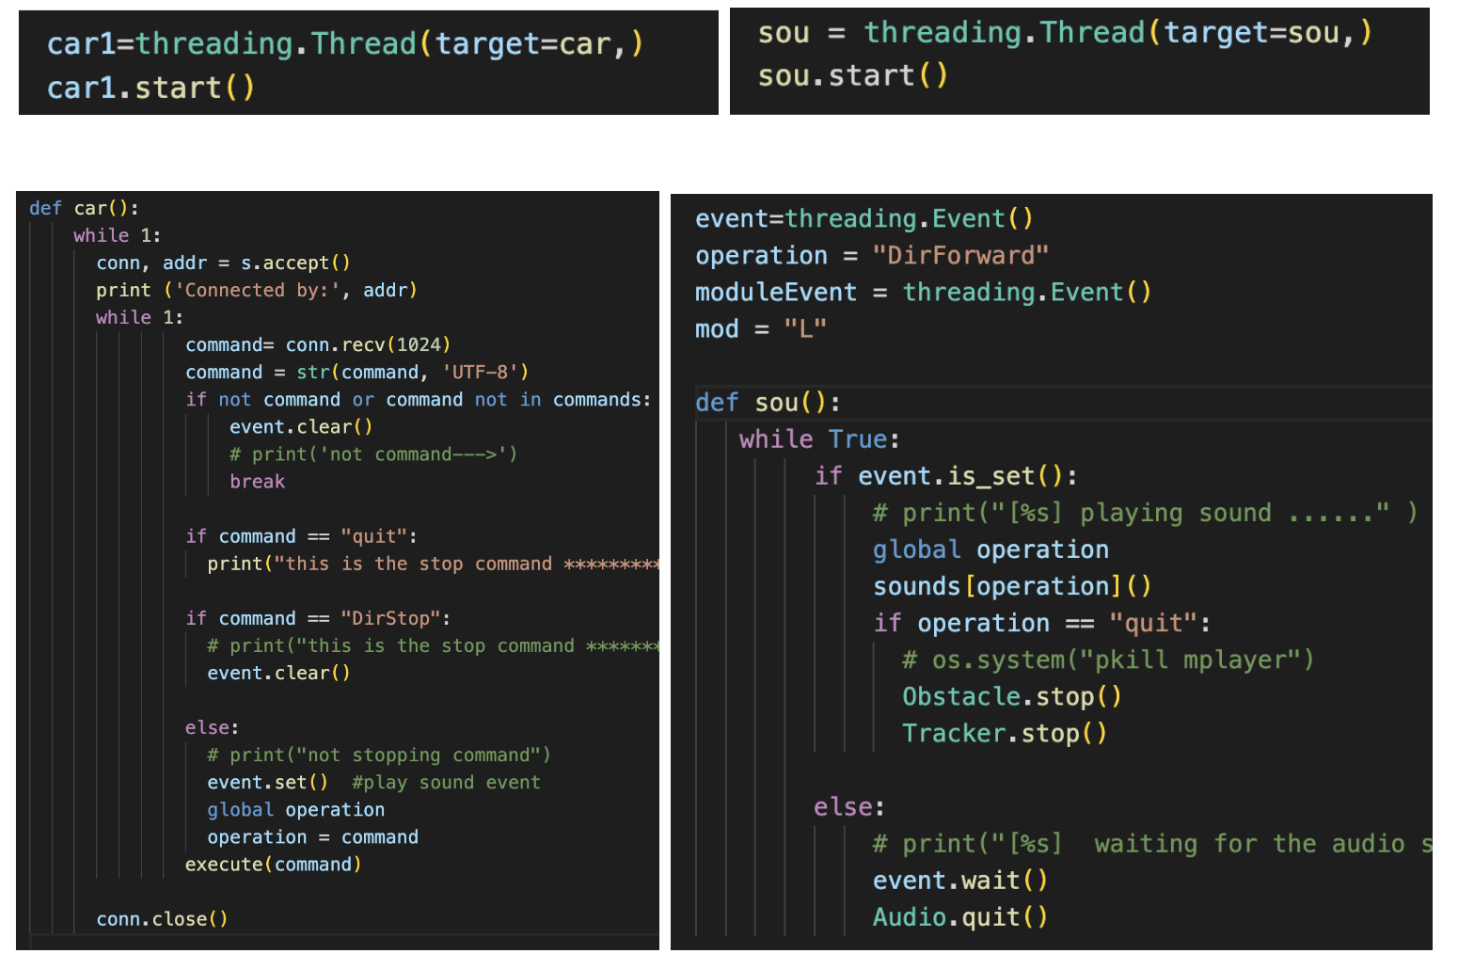
As we would like to achieve the result of concurrent locomotion(forward, backward, left, right and obstacle) and BB8 singing a related song, there are mainly two kinds of commands for our program to set multi-threading programming.
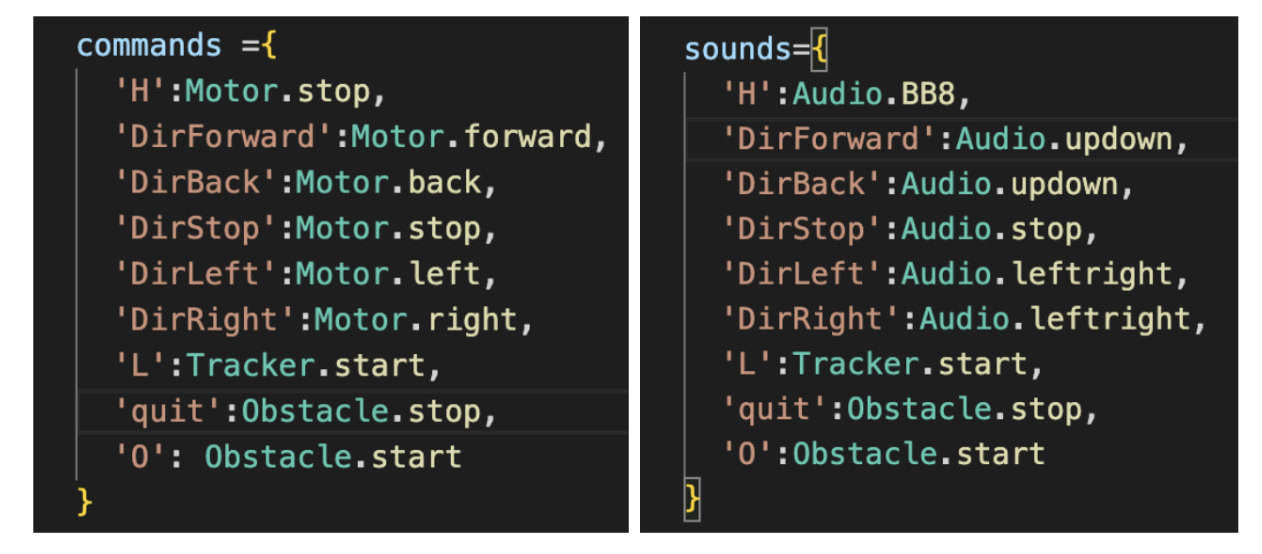
When the server.py program is running, we will start two threads, “sou” for event detection of sounds’ playing and history video showing, and “car” for the locomotion control, line tracker module and obstacle module. The main socket listening and commands parsing functions are in “car” threading and we set the event or not to control the “sou” thread actions. If the command is supposed to have sounds, the event is set and global operation is recorded the current command so that we could pass this command value to the “sou” thread and then play the related sounds.
5. Line Tracking:
The module we are using is the LM393, the detection principle of tracking is that the infrared emitting tube emits light to the road surface, and the infrared light is reflected when it encounters a light-colored ground such as a white line. The receiving tube receives the reflected light and outputs a low level after being shaped by a Schmidt trigger. When red external light encounters darker ground such as black lines, it is absorbed, and the receiving tube does not receive the reflected light, and the output is high after being shaped by the Schmidt transmitter. So we have two line tracking modules, with one installed on the left and the other one on the right, if the left module has a high output signal and the right one with a low output signal, we will drive the ball to move left, so it will get close to the line as we expected as possible. More details could be found in the “line_tracker.py”.
6. Obstacle Avoidance
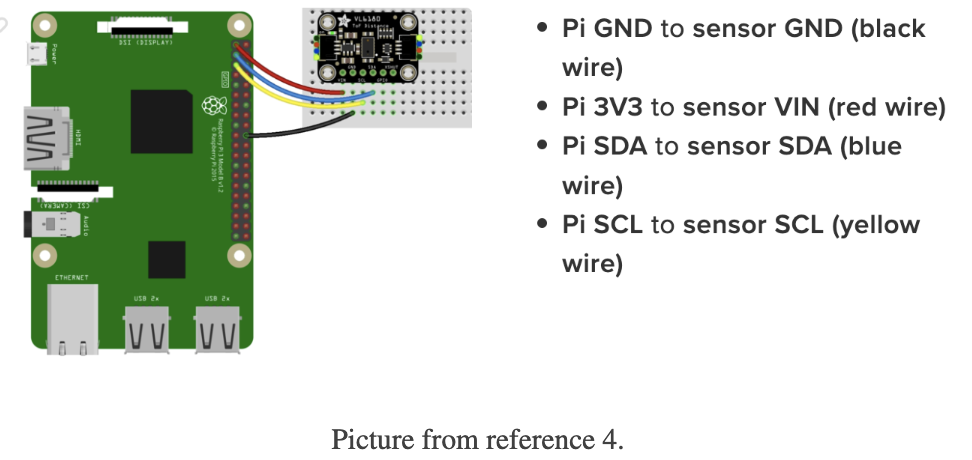
We connected the the VL6080x to the raspberry pi as obstacle avoidance module as follows: When we click the obstacle button, the application will go into the obstacle threading, if we click the “quit” button, the thread could quit. As for the ball structure, we set a while loop to continuously sense the distance, or move forwards. If the sensor.range is detected to be smaller than 200, we will go into obstacle avoidance mode: playing the obstacle auto, robot moving backwards for 2 seconds, and turning left for 1 second. Otherwise, the robot will keep moving forward.

Drawings

Testing
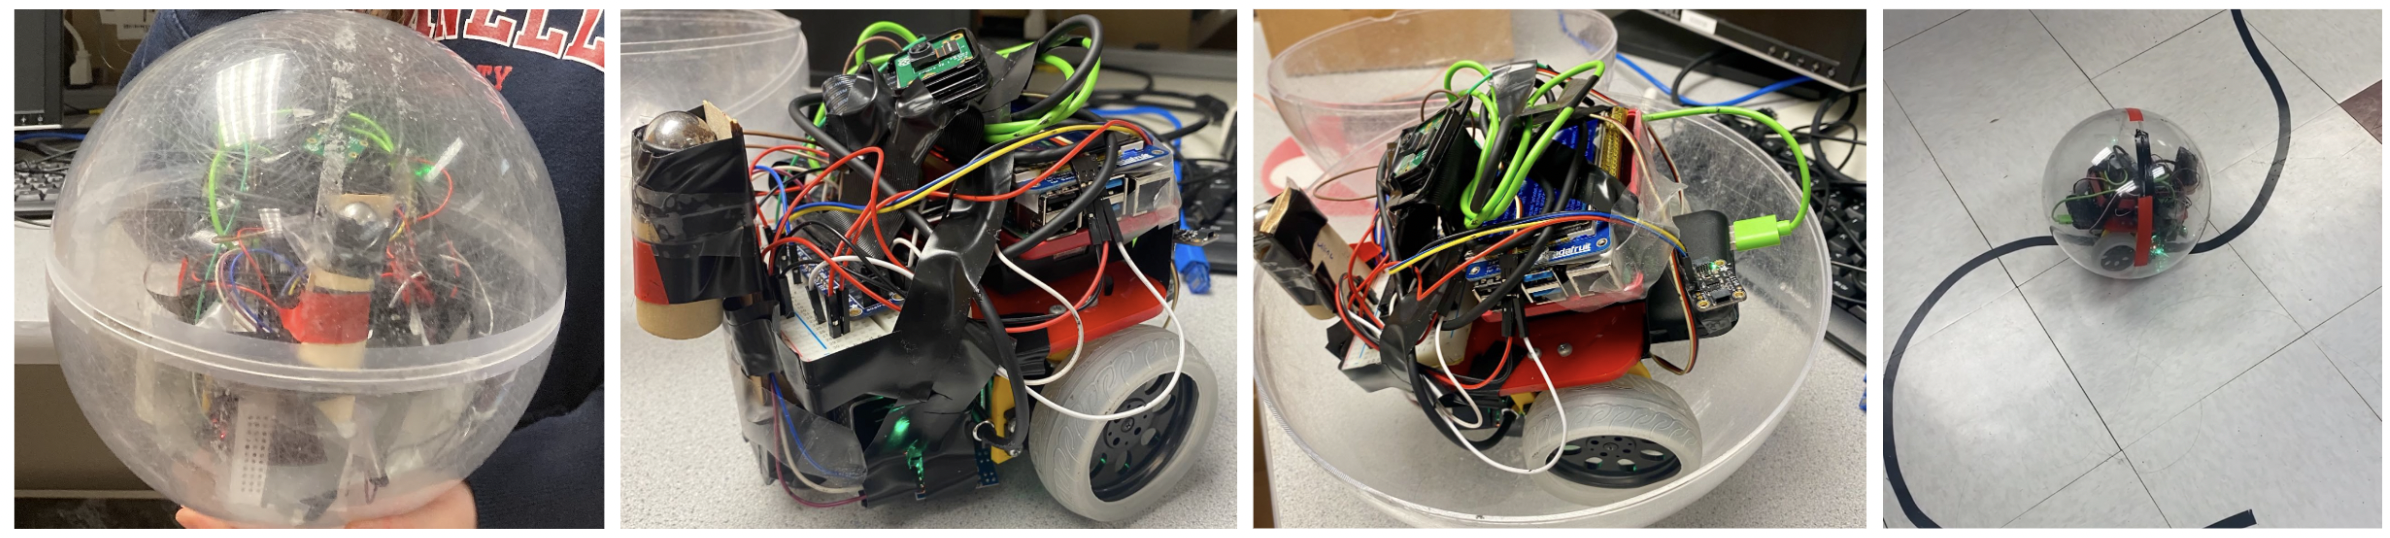
We firstly try to do finish the things on pure car and android control. We met with bus error on installment of VL6080X, we test all the code we could and finally found that we have welding problem through multimeter of Buzzer. We also met some problems on Android design, such as tcp parsing error and platform design error, but we fixed all the problems step by step. It seems that everything workds fine at first in the pure car. After that, we were happy to put the car into the ball. But the difficulty beats us a lot. The car is not large enough to move stably in the ball, so that we suffer a lot to figure out a way to make it balanced. To solve the problem of flipping over, we firstly find out a very naive way that we apply a piece of tape along the diameter of the hemisphere so that the cart's wheels are always in contact with the ball and don't tip over to the other side. But the problem with the tape is that the service life is only one-time, and the tape will fall off after a few turns. So we also tried to use popsicle sticks to maintain balance, but it still failed. Finally, we came up with a way to install a pulley balance bar on the top of the trolley, which played an excellent role in preventing rolling. Of course, if the ball rolls too fast, bb8 will look like drunk. After solving the flipping error, we find that the line tracker module and obstacle module has problems when running in the car. We tried many experiments to adjust the installation structure and motor speed to make the locomotion and recognition both work well.
Result
We successfully designed the whole system as mentioned in the goals. We are able to download the Android App on the phone and use the app to control the Raspberry Pi. Our bb8 is smart to go forwards, backwards, left, right, line tracking, obstacle avoidance and see history as commands concurrently. BB8 could also sing as well as locomote as we planned. Happy to play with BB8!
Work Distribution
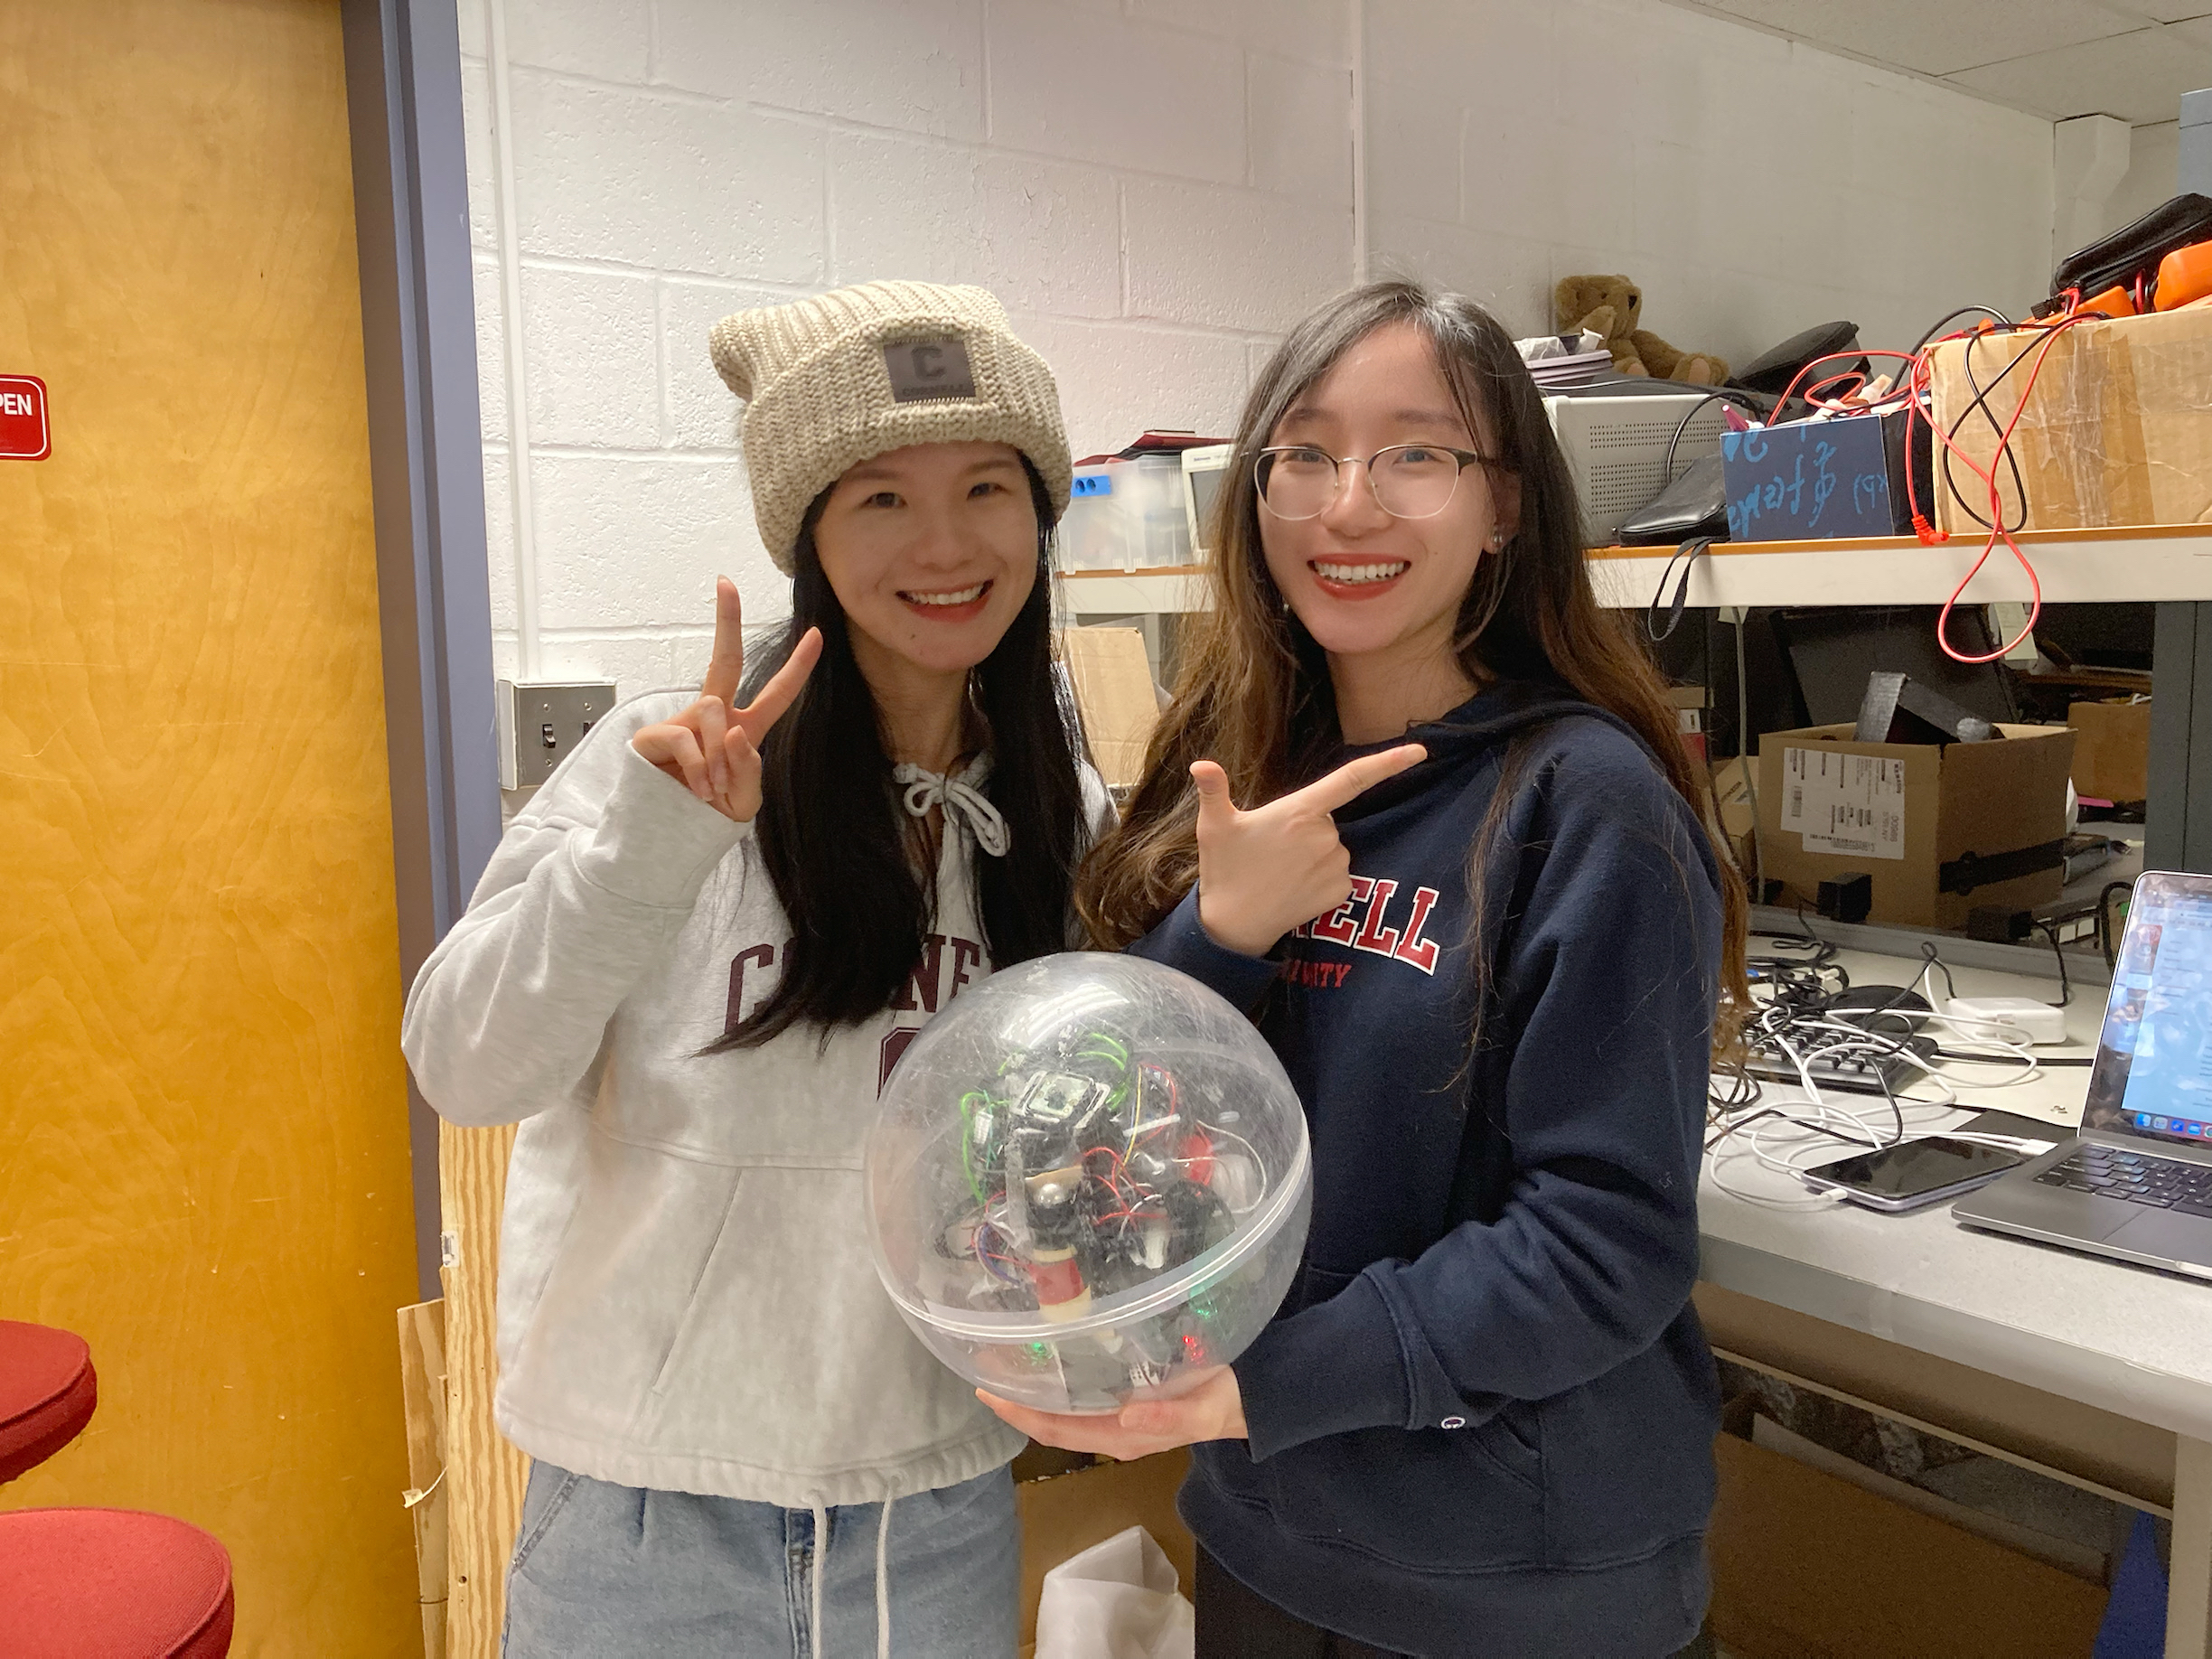
Project group picture
Shiyin Tang
st966@cornell.edu
Designed the linetracker module, audio module, camera deploy module and server module.

Lijuan Hu
lh665@cornell.edu
Designed the obstacle module, android module and server module.
Parts List
- Raspberry Pi -Provided in Lab
- Raspberry Pi Camera V2–Provided in Lab
- Servo Motors and Wheels -Provided in Lab
- Resistors and Wires - Provided in lab
- Line Tracking module: LM393 - Provided in Lab
- VL6080 distance module - Provided in Lab
- Speaker - Provided in Lab
- Ball 1 24.65
- Ball 2 $26.04
- Speaker * 2 8.99
Total: Additional $59.68
References
PiCamera DocumentParallax Servo Datasheet
Pigpio Library
VL6080X document
LM393 Line Tracking Document
mplayer
Android Socket Programming
Python Socket Programming
WebView on Android Phone
Code Appendix
                #Obstacle module
                # SPDX-FileCopyrightText: 2018 Tony DiCola for Adafruit Industries
                # SPDX-License-Identifier: MIT

                # Demo of reading the range and lux from the VL6180x distance sensor and
                # printing it every second.

                import time

                import board
                import busio
                from motor import Motor,Motor_Line
                from audio import Audio

                import adafruit_vl6180x

                import time,threading

                event=threading.Event()

                class Obstacle:
                    def start():
                        event.set()
                        print("event clean, start obstacle")

                    def stop():
                        event.clear()
                        Motor.stop()
                        print("this is setting the stop!!!!!")

                    # @staticmethod
                    def obstacle():
                        while True:
                            if not event.is_set():
                                print("[%s] stopping ......")
                                Motor.stop()
                                event.wait()
                                # time.sleep(1)
                            else:

                                i2c = busio.I2C(board.SCL, board.SDA)
                                sensor = adafruit_vl6180x.VL6180X(i2c)
                                range_mm = sensor.range
                                print("Range: {0}mm".format(range_mm))

                                print("this is run---")
                                while sensor.range <= 200:
                                        Audio.obstacle()
                                        Motor.back()
                                        time.sleep(2)
                                        Motor.left()
                                        time.sleep(2)

                                Motor.forward()
                                light_lux = sensor.read_lux(adafruit_vl6180x.ALS_GAIN_1)
                                # Delay for a second.
                                time.sleep(1)
                    ob = threading.Thread(target=obstacle,)
                    ob.start()
                #Line tracker module
                import RPi.GPIO as GPIO
                import time
                from motor import Motor_Line,Motor
                import sys
                # import time.threading

                TrackPin1 = 21 #line tracker DO
                TrackPin2 = 22 #number 2 line tracker D0
                LedPin   = 19 # LED pin is 19

                run = True
                # def setup():


                def loop():
                    # while True:
                    GPIO.setmode(GPIO.BCM)
                    GPIO.setup(TrackPin1, GPIO.IN, pull_up_down=GPIO.PUD_UP)
                    GPIO.setup(TrackPin2, GPIO.IN, pull_up_down=GPIO.PUD_UP)
                    GPIO.setup(26, GPIO.OUT) # set GPIO 26 as output for left motor
                    # GPIO.output(26, GPIO.LOW)
                    GPIO.setup(16, GPIO.OUT) # set GPIO 16 as output for right motor
                    # GPIO.output(16, GPIO.LOW)
                    if GPIO.input(TrackPin1) == GPIO.LOW and GPIO.input(TrackPin2) == GPIO.LOW:
                        # print('Both White')  #此时那个绿色的等亮
                        Motor_Line.forward()
                        # GPIO.output(LedPin, GPIO.LOW)  # white line, led off #等弄完了再加,记得加入!!!!
                    elif(GPIO.input(TrackPin1) == GPIO.LOW and GPIO.input(TrackPin2) == GPIO.HIGH):
                        # print('2 Black')
                        Motor_Line.left()
                    elif(GPIO.input(TrackPin1) == GPIO.HIGH and GPIO.input(TrackPin2) == GPIO.LOW):
                        Motor_Line.right()
                        # GPIO.output(LedPin, GPIO.HIGH) # led on
                    elif(GPIO.input(TrackPin1) == GPIO.HIGH and GPIO.input(TrackPin2) == GPIO.HIGH):
                        Motor_Line.left()

                def destroy():
                    # GPIO.output(LedPin, GPIO.LOW)     # led off
                    GPIO.cleanup()                     # Release resource

                GPIO.setmode(GPIO.BCM) # Set for broadcom numbering not board numbers...


                GPIO.setup(TrackPin1, GPIO.IN, pull_up_down=GPIO.PUD_UP)
                GPIO.setup(TrackPin2, GPIO.IN, pull_up_down=GPIO.PUD_UP)

                class Tracker:
                    @staticmethod
                    def start():

                        try:
                            # print("start the line tracking------->")
                            loop()
                        except KeyboardInterrupt:
                        # When 'Ctrl+C' is pressed, the child program destroy() will be  executed.
                            destroy()
                    @staticmethod
                    def stop():
                        # sys.exit()
                        destroy()
                #motor
                import time
import RPi.GPIO as GPIO
import threading
import os
GPIO.setmode(GPIO.BCM) # Set for broadcom numbering not board numbers...
GPIO.setup(26, GPIO.OUT) # set GPIO 26 as output for left motor
GPIO.output(26, GPIO.LOW)
GPIO.setup(16, GPIO.OUT) # set GPIO 16 as output for right motor
GPIO.output(16, GPIO.LOW)

#clk & counter-clk:
fc = 1/0.0210 #3
dc = 100/21.0
fcc = 1/0.0220 #217
dcc = 200/22.0
#slower
fc_l = 1/0.02144  #214
dc_l = 144/21.44
fcc_l = 1/0.02154 #216
dcc_l = 154/21.54

# To create a PWM instance:
pa = GPIO.PWM(26, fc)
pa.start(0)
pb = GPIO.PWM(16, fc)
pb.start(0)

# time.sleep(10)
# GPIO.cleanup()

class Motor:
	@staticmethod
	def forward():
		GPIO.setmode(GPIO.BCM) # Set for broadcom numbering not board numbers...
		GPIO.setup(26, GPIO.OUT)
		GPIO.setup(16, GPIO.OUT)
		pa.ChangeDutyCycle(dcc)
		pa.ChangeFrequency(fcc)
		pb.ChangeDutyCycle(dc)
		pb.ChangeFrequency(fc)
		Info.p('Car Forwarding--->')
	@staticmethod
	def back():
		GPIO.setmode(GPIO.BCM) # Set for broadcom numbering not board numbers...
		GPIO.setup(26, GPIO.OUT)
		GPIO.setup(16, GPIO.OUT)
		# start = time.time()
		# while ( time.time() - start < 0.5 ) :
		pa.ChangeDutyCycle(dc)
		pa.ChangeFrequency(fc)
		pb.ChangeDutyCycle(dcc)
		pb.ChangeFrequency(fcc)
		Info.p('Car Backing--->')
	@staticmethod
	def left():
		GPIO.setmode(GPIO.BCM) # Set for broadcom numbering not board numbers...
		GPIO.setup(26, GPIO.OUT)
		GPIO.setup(16, GPIO.OUT)
		# start = time.time()
		# while ( time.time() - start < 0.5 ) :
		pa.ChangeDutyCycle(0)
		pa.ChangeFrequency(1/0.0215)
		pb.ChangeDutyCycle(dc)
		pb.ChangeFrequency(fc)
		Info.p('Car Turning Left--->')
	@staticmethod
	def right():
		GPIO.setmode(GPIO.BCM) # Set for broadcom numbering not board numbers...
		GPIO.setup(26, GPIO.OUT)
		GPIO.setup(16, GPIO.OUT)
		# start = time.time()
		# while ( time.time() - start < 0.5 ) :
		pa.ChangeDutyCycle(dcc)
		pa.ChangeFrequency(fcc)
		pb.ChangeDutyCycle(0)
		pb.ChangeFrequency(1/0.0215)
		Info.p('Car Turning Right--->')
	@staticmethod
	def stop():
		# start = time.time()
		# while ( time.time() - start < 0.5 ) :
		pa.ChangeDutyCycle(0)
		pa.ChangeFrequency(1/0.0215)
		pb.ChangeDutyCycle(0)
		pb.ChangeFrequency(1/0.0215)
		Info.p('Car Stopping--->')


class Info:
	@staticmethod
	def p(message):
		print ('Info: '+message)


class Motor_Line:
	@staticmethod
	def forward():
		Info.p('Line forward--->')
		GPIO.setmode(GPIO.BCM) # Set for broadcom numbering not board numbers...
		GPIO.setup(26, GPIO.OUT)
		GPIO.setup(16, GPIO.OUT)
		pa.ChangeDutyCycle(dcc_l)
		pa.ChangeFrequency(fcc_l)
		pb.ChangeDutyCycle(dc_l)
		pb.ChangeFrequency(fc_l)
		# time.sleep(5)
	@staticmethod
	def right():
		GPIO.setmode(GPIO.BCM) # Set for broadcom numbering not board numbers...
		GPIO.setup(26, GPIO.OUT)
		GPIO.setup(16, GPIO.OUT)
		pa.ChangeDutyCycle(dcc_l)
		pa.ChangeFrequency(fcc_l)
		pb.ChangeDutyCycle(0)
		pb.ChangeFrequency(1/0.0215)
		Info.p('Line right----->')
	@staticmethod
	def left():
		GPIO.setmode(GPIO.BCM) # Set for broadcom numbering not board numbers...
		GPIO.setup(26, GPIO.OUT)
		GPIO.setup(16, GPIO.OUT)
		pa.ChangeDutyCycle(0)
		pa.ChangeFrequency(1/0.0215)
		pb.ChangeDutyCycle(dc_l)
		pb.ChangeFrequency(fc_l)
		Info.p('Line left------>')
                #server
                from socket import *
import sys
import time
from motor import Motor
from audio import Audio
from line_tracker import Tracker
import RPi.GPIO as GPIO
from obstacle import Obstacle
# import rpi_camera_surveillance_system

commands ={
  'H':Motor.stop,
  'DirForward':Motor.forward,
  'DirBack':Motor.back,
  'DirStop':Motor.stop,
  'DirLeft':Motor.left,
  'DirRight':Motor.right,
  'L':Tracker.start,
  'quit':Obstacle.stop,
  'O': Obstacle.start
}

sounds={
  'H':Audio.BB8,
  'DirForward':Audio.updown,
  'DirBack':Audio.updown,
  'DirStop':Audio.stop,
  'DirLeft':Audio.leftright,
  'DirRight':Audio.leftright,
  'L':Tracker.start,
  'quit':Obstacle.stop,
  'O':Obstacle.start
}

# Audio.updown()
def playsound(command):
  print(command)
  sounds[command]()

def execute(command):
	commands[command]()

HOST ='10.49.241.19' #the ip of rapberry pi
PORT = 8701
s= socket(AF_INET, SOCK_STREAM)
s.bind((HOST, PORT))
s.listen(1)
print ('listening on 8701')

import time,threading

event=threading.Event()
operation = "DirForward"
moduleEvent = threading.Event()
mod = "L"

def sou():
   while True:
        if event.is_set():
            # print("[%s] playing sound ......" )
            global operation
            sounds[operation]()
            if operation == "quit":
              # os.system("pkill mplayer")
              Obstacle.stop()
              Tracker.stop()

        else:
            # print("[%s]  waiting for the audio setting..")
            event.wait()
            Audio.quit()

def car():
    while 1:
      conn, addr = s.accept()
      print ('Connected by:', addr)
      while 1:
              command= conn.recv(1024)
              command = str(command, 'UTF-8')
              if not command or command not in commands:
                  event.clear()
                  # print('not command--->')
                  break

              if command == "quit":
                print("this is the stop command **************")

              if command == "DirStop":
                # print("this is the stop command **************")
                event.clear()

              else:
                # print("not stopping command")
                event.set()  #play sound event
                global operation
                operation = command
              execute(command)

      conn.close()

sou = threading.Thread(target=sou,)
sou.start()


car1=threading.Thread(target=car,)
car1.start()
                #audio

import subprocess
import os
import sys
import time

# from omxplayer.player import OMXPlayer
# from pathlib import Path
# from time import sleep

# up_path = Path("obstacle_aoo.mp3")

# player_up = OMXPlayer(up_path)
# sleep(1)
# player_up.quit()


paths ={
  'obstacle':"obstacle_aoo.mp3",
  'updown':"updown.mp3",
  'leftright':"leftright.mp3",
  'stop':"stop.mp3",
  'H':"BB8video.mp4"
}

# path_obstacle = "obstacle_aoo.mp3"

# Use a python os call to execute some 'echo' commands...
class Audio:
    def quit():
        print('quit-->')
        # player_up.quit()
        os.system("mplayer q")

    @staticmethod
    def BB8():
        # thread = threading.Thread(target = BB8)
        # player_up = OMXPlayer(up_path)
        os.system('sudo SDL_VIDEODRIVER=fbcon SDL_FBDEV=/dev/fb0 mplayer -vo sdl -framedrop -zoom -x 320 -y 220 %s' % paths['H'])
        print('here play BB8') #对应updown.mp3
        # time.sleep(1)
    @staticmethod
    def updown():
        # player_up = OMXPlayer(up_path)
        os.system('mplayer %s' % paths['updown'])
        print('here play forward audio') #对应updown.mp3
        # time.sleep(1)

    @staticmethod
    def leftright():
        os.system('mplayer %s' % paths['leftright'])
        print('here play left audio') #对应leftright.mp3

    @staticmethod
    def stop():
        os.system('mplayer %s' % paths['stop'])
        print('here play stop audio') #对应stop.mp3

    @staticmethod
    def obstacle():
        os.system('mplayer %s' % paths['obstacle'])
        # os.system ("echo 'seek +10' > /home/pi/video_fifo")
        print('here play obstacle audio') #对应obstacle_aoo.mp3

    @staticmethod
    def mute():
        print("no play")

    @staticmethod
    def mute1():
        print("mute1")

# v=input()
 # if (v == "play"):
class Play:
    @staticmethod
    def play():
        Audio.updown()
        time.sleep(1)
        Audio.quit()
                #Android main page
                package com.example.myapplication1;


import android.app.Activity;
import android.content.ComponentName;
import android.content.Context;
import android.content.Intent;
import android.content.ServiceConnection;
import android.os.*;
import android.view.MotionEvent;
import android.view.View;
import android.webkit.WebChromeClient;
import android.webkit.WebSettings;
import android.widget.Button;
import android.widget.Toast;
import androidx.appcompat.app.AppCompatActivity;
import android.webkit.WebView;
import android.webkit.WebViewClient;


public class MainActivity extends AppCompatActivity{
    private String host;
    private int port;
    public static Context context;
    private WebView webview;
    private boolean booleanConnect = false;
    boolean longPress = false;
    public TcpCommandService.SendCommandBinder sendCommandBinder=null; //Use this binder to notify service sending command data
    private ServiceConnection tcpConnection=new ServiceConnection() { //The connection between Main activity and TcpCommandService
        @Override
        public void onServiceConnected(ComponentName name, IBinder service) {
            sendCommandBinder=(TcpCommandService.SendCommandBinder)service;
        }

        @Override
        public void onServiceDisconnected(ComponentName name) {
        }
    };

    public UDPFrameRecService.NoticeBinder noticeUDPBinder=null;//Use this binder to notify UDP service
    private ServiceConnection udpConnection=new ServiceConnection() {
        @Override
        public void onServiceConnected(ComponentName name, IBinder service) {
            noticeUDPBinder=(UDPFrameRecService.NoticeBinder)service;
        }

        @Override
        public void onServiceDisconnected(ComponentName name) {

        }
    };

    @Override
    protected void onCreate(Bundle savedInstanceState) {
        longPress = false;
        super.onCreate(savedInstanceState);
        setContentView(R.layout.activity_main);
        //context=getApplicationContext();
        context=this;//Get the context of this activity so that the static functions can use
        webview =(WebView)findViewById(R.id.webView);

        webview.setWebViewClient(new WebViewClient());
        webview.getSettings().setJavaScriptEnabled(true);
        webview.getSettings().setDomStorageEnabled(true);
        webview.setOverScrollMode(WebView.OVER_SCROLL_NEVER);
        WebSettings settings = webview.getSettings();

        if (Build.VERSION.SDK_INT >= Build.VERSION_CODES.KITKAT) {
            settings.setMixedContentMode(WebSettings.MIXED_CONTENT_ALWAYS_ALLOW);
        }
        settings.setLoadsImagesAutomatically(true);

        settings.setUseWideViewPort(true);
        settings.setLoadWithOverviewMode(true);

        webview.setWebChromeClient(new WebChromeClient() );
        webview.loadUrl("http://10.49.241.19:8000/index.html");

        Intent startInfoIntent=getIntent();
        host=startInfoIntent.getStringExtra("tcpHost");
        port=startInfoIntent.getIntExtra("tcpPort",50);

        Intent startTcpServiceIntent=new Intent(this,TcpCommandService.class);
        startTcpServiceIntent.putExtra("tcpHost",host);
        startTcpServiceIntent.putExtra("tcpPort",port);

        //Start and bind TcpCommandService
        startService(startTcpServiceIntent);
        bindService(startTcpServiceIntent,tcpConnection,BIND_AUTO_CREATE);
        initButtons();


    }

    @Override
    protected void onDestroy() {
        super.onDestroy();
        unbindService(tcpConnection);
        stopService(new Intent(this,TcpCommandService.class));

    }


    /**
     * Init the Direction Buttons and Camera Buttons, set OnTouchListener for these buttons so
     * command can be sent when buttons are down or up.
     */
    public void initButtons()
    {
        Button buttonQuit=(Button)findViewById(R.id.buttonQuit);
        buttonQuit.setOnTouchListener(new ButtonListener("quit","quit"));

        Button buttonLine=(Button)findViewById(R.id.buttonLineTracker);
        buttonLine.setOnTouchListener(new ButtonListener("L","L"));

        Button buttonObs=(Button)findViewById(R.id.buttonObstacle);
        buttonObs.setOnTouchListener(new ButtonListener("O","O"));

        Button buttonHis=(Button)findViewById(R.id.buttonHistory);
        buttonHis.setOnTouchListener(new ButtonListener("H","H"));

        Button buttonDirFor=(Button)findViewById(R.id.buttonDirForward);
        buttonDirFor.setOnTouchListener(new ButtonListener("DirStop","DirForward"));
        Button buttonDirBack=(Button)findViewById(R.id.buttonDirBack);
        buttonDirBack.setOnTouchListener(new ButtonListener("DirStop","DirBack"));
        Button buttonDirLeft=(Button)findViewById(R.id.buttonDirLeft);
        buttonDirLeft.setOnTouchListener(new ButtonListener("DirStop","DirLeft"));
        Button buttonDirRight=(Button)findViewById(R.id.buttonDirRight);
        buttonDirRight.setOnTouchListener(new ButtonListener("DirStop","DirRight"));
        Button buttonDirStop=(Button)findViewById(R.id.buttonDirStop);
        buttonDirStop.setOnTouchListener(new ButtonListener("DirStop","DirStop"));
        Button buttonClose=(Button)findViewById(R.id.buttonClose);
        buttonClose.setOnClickListener(new View.OnClickListener() {
            @Override
            public void onClick(View v) {
                sendCommandBinder.closeOrShutdown("Close"); //Notify the car this client will close the connection
            }
        });

        Button buttonShutdown=(Button)findViewById(R.id.buttonShutdown);
        buttonShutdown.setOnClickListener(new View.OnClickListener() {
            @Override
            public void onClick(View v) {
                sendCommandBinder.closeOrShutdown("Shutdown"); //Notify the car to shutdown itself
            }
        });
    }

    /**
     * When a control button is down or up, send the command
     */
    class ButtonListener implements View.OnTouchListener{
        private String buttonUpCommand; //Specify the command when button is up
        private String buttonDownCommand; //Specify the command when button is down
        public ButtonListener(String buttonUpCommand,String buttonDownCommand){
            this.buttonUpCommand=buttonUpCommand;
            this.buttonDownCommand=buttonDownCommand;
        }
        @Override
        public boolean onTouch(View v, MotionEvent event) {
            longPassCmd(event);
            return true;
        }
        private void longPassCmd( MotionEvent event){
            switch (event.getAction()){

                case MotionEvent.ACTION_DOWN:{
                    longPress = true;
                    Thread longPressThread = new Thread(){
                        public void run(){
                            super.run();
                            while(true){
                                if(longPress == true){
                                    try{
                                        sendCommandBinder.sendCommand(buttonDownCommand);
                                        Thread.sleep(1000);
                                    }catch (InterruptedException e){
                                        e.printStackTrace();
                                    }
                                }else{
                                    break;
                                }
                            }
                        }
                    };
                    longPressThread.start();
                    break;
                }
                case MotionEvent.ACTION_UP:
                    longPress = false;
                    sendCommandBinder.sendCommand(buttonUpCommand);
                    break;

                default:
                    break;
            }
        }
    }


    public static final int TOAST_TEXT=1;
    public static final int CLOSE_OR_SHUTDOWN=2;
    public static final int UPDATE_IMAGEVIEW=3;
    /**
     * Use the handler to update main activity according to service's message
     */
    public static Handler updateUIHandler=new Handler(){
        @Override
        public void handleMessage(Message msg) {
            switch (msg.what){
                case TOAST_TEXT: //Display the toast according to the message from service
                    Toast.makeText(context,(String)msg.obj,Toast.LENGTH_SHORT).show();
                    break;
                case CLOSE_OR_SHUTDOWN: //The tcp service has sent close or shutdown command, and the main activity should exit now
                    ((MainActivity)context).finish();
                    break;

                default:
                    break;
            }
        }
    };
}